

The recording tape appears as a graduated ruler.
You will print the animation of an object or a group of objects on it.
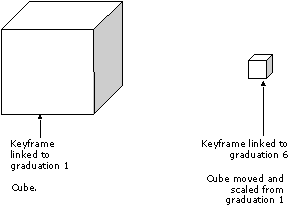
At each step, you will link a picture of the object as it is at a given moment (position and appearance).
q Frame concepts: keyframe and intermediate frame
· A frame:
A frame represents the object to be animated at a given moment (position and appearance).
In an animation, the frames are sequenced. A frame is linked to a graduation of the recording tape.
There are two kinds of frames:
· The keyframes (marked in green)
· The intermediate frames
If the tape is still blank, there are no frames linked to any of the graduations.
By default, there are 99 frames per animation.
An editable counter at the right side of the graduated ruler indicates the maximum number of frames.
To modify this number:
· Click on the editable zone.
· Enter a number.
· Press the Return key to validate.
· A keyframe:
A keyframe is a frame that contains all of the information concerning the movement and deformation applied to the object from the previous keyframe.

You can Create, Copy, Paste, Reproduce and Delete a keyframe .
· An intermediate frame:
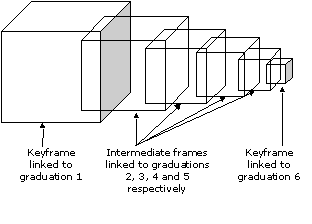
Between two consecutive keyframes, Amapi 3D automatically generates what we call the intermediate frames.
Amapi 3D generates the same number of intermediate frames as the number of graduations between two consecutive keyframes.

You cannot Copy, Paste or Delete an intermediate frame.
However, you can convert an intermediate frame into a keyframe.
q To go to a specific graduation of the tape
Several methods are available. Choose the one you want:
· 1st method: Enter the number corresponding to the desired graduation.
Click on the editable zone.
Enter a number.
Press the Return key to validate.
The cursor is automatically positioned at this graduation.
Amapi 3D immediately displays the frame linked to this graduation.
· 2nd method: Move the graduated ruler cursor.
By moving the cursor of the graduated ruler, you can position the scene at the desired graduation.
You can watch the animation playing while you move the cursor.
· 3rd method: Click on the graduated ruler.
Click on the graduated ruler at the desired graduation.
The cursor is automatically positioned at this graduation.
Amapi 3D immediately displays the frame linked to this graduation.
· 4th method: Use the commands that allow you to play the animation.
See “Play an animation” (User Manual/ Animation /Edit an animation / Play an animation).
To link a keyframe to a graduation of the tape, you must do the following:
· Create or modify a keyframe:
1. Go to the desired graduation:
To be positioned on the desired graduation, please refer to the above paragraph: “To go to a specific graduation of the tape”.
There are several possible scenarios:
· If you ask for a graduation greater than the last keyframe of the tape, Amapi 3D will display the last keyframe of the tape.
· If you ask for a graduation already linked to a keyframe, Amapi 3D will display this keyframe. In this case you will modify this keyframe.
· If you ask for a graduation already linked to an intermediate frame, Amapi 3D will display this intermediate frame. In this case you will replace this intermediate frame by a keyframe.
2. Move and/or deform the object to be animated:
Now that the cursor is positioned on the desired graduation of the ruler, move or deform the object to be animated.
To do this, you can use any of the following tools:
· Move
· Rotate
· Scale
· Deformers
· Mold
· Stretch
· Bend
![]()
The frame becomes a keyframe only if you use a tool on the object. If you don’t use a tool:
· If the graduation was not linked to a frame, it remains without a linked frame.
· If the graduation was linked to a frame, that frame will still remain linked to this graduation.
![]()
If you went to step 2 without doing step 1, there is the risk that your new keyframe will be linked to the wrong graduation.
· Copy-paste a keyframe:
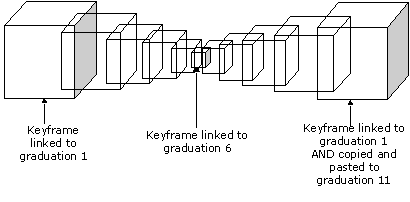
With this tool you will copy a frame linked to a graduation so that you can link a copy of it to another graduation.

![]()
You can use this tool to make sure that an object is not altered between two graduations.
1. Get positioned on the graduation corresponding to the keyframe to be copied:
To be positioned on the desired graduation, please refer to the paragraph: “To go to a specific graduation of the tape”.
2. Copy the keyframe:
· PC: Press and hold the right mouse button. Mac: Press and hold the Option key and press and hold the mouse button
· Position the cursor on “Copy”.
· Release the mouse button.
3. Get positioned on the graduation where you want to paste the copied keyframe:
Go to the desired graduation by using the technique described in step 1.
4. Paste the keyframe.
· PC: Press and hold the right mouse button. Mac: Press and hold the Option key and press and hold the mouse button
· Position the cursor on “Paste”.
· Release the mouse button.
The pasted frame becomes linked to the current graduation.
5. Eventually transform the new keyframe.
If you want, you can move or transform the object to be animated.
To do this, you may use the following tools:
· Move
· Rotate
· Scale
· Deformers
· Mold
· Stretch
· Bend
· Reproduce an action:
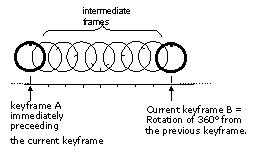
This tool is used to take an action that was made between two consecutive keyframes, and apply it to the rest of the graduations until the end of the tape.
Here, “action” means all of the movements and deformations applied to an object between the two keyframes.
Example:
You can use this features to apply a rotation to a wheel until the end of the animation.
Assume that you have recorded the rotation movement between keyframe A and keyframe B, and Amapi 3D has generated the intermediate frames.

Using this feature, with one click, you can reproduce this action until the end of the animation:

1. Get positioned on the graduation corresponding to the end-of-action keyframe.
To get positioned at the desired graduation, refer to the paragraph: “To go to a specific graduation of the tape”.
The keyframe linked to this graduation becomes the current keyframe.
2. Reproduce the current keyframe action.
· PC: Press and hold the right mouse button. Mac: Press and hold the Option key and press and hold the mouse button.
· Position the cursor on “Reproduce”.
· Release the mouse button.
Amapi 3D reproduces this action until the end of the animation.
· Delete a keyframe
Example:
Animation recorded with three keyframes:
|
|
|
|
Keyframe
|
Keyframe
|
Keyframe
|
After deleting the keyframe linked to graduation 5, we get the following animation:
|
|
| |
Keyframe
|
Keyframe
|
1. Get positioned on the graduation corresponding to the keyframe to be deleted.
To get positioned on the desired graduation, refer to the paragraph: “To go to a specific graduation of the tape”.
2. Deleting the keyframe.
· PC: Press and hold the right mouse button. Mac: Press and hold the Option key and press and hold the mouse button.
· Position the cursor on “Reproduce”.
· Release the mouse button.
q Delete the animation of an object
· Click on the Information icon of the Control Panel.
· Click on “Delete the animation information”.
· Click on the OK button.
